


Grading Made Simple
By Angela Watson
If you’re looking for a more efficient method of grading papers and assessing student progress, you’ve come to the right place. On this page (which has been adapted from The Cornerstone book), you’ll learn tips and tricks to help you gauge student progress quickly and easily.
Using simple and consistent markings
Choose your color for grading and use it exclusively. I use red because it stands out well and makes it clear to parents and kids what I have written vs. what they have written (my kids often correct their own papers using blue pens). Red is the traditional teacher color, and I think that some of us as adults are kind of scarred from seeing red marks on our papers as kids. However, a young child hasn’t had those types of experiences and therefore there are no negative connotations. I also use red ink for all of my stamps, so my kids associate red with positive messages, too.
I think seeing numerous corrections can be intimidating in any color, so it’s more important to focus on what types of marks you are making on the paper. Be sure to use simple, quick markings, and be consistent with them. For example, I don’t make big Xs by or circle wrong answers, I just draw a slash through the problem numbers.
Try not to make more work for yourself. I once knew a teacher who wrote the correct answers next to wrong ones on EVERY student paper. That’s great for the kid and parent (assuming they actually read each paper) but it took her a half an hour just to grade a set of spelling tests! Another teacher I know circles the correct answers and leaves the incorrect ones alone. This helps build student confidence and makes marks from the teacher a good thing (the more, the better!) rather than a bad thing. I love this concept, but again, I wouldn’t do it for the whole class because it is too time-consuming.
Keep papers from piling up
Try not to let students’ ungraded work sit out on your desk: until you’re ready to grade, leave it in the file trays where kids turned it in. Messy piles accumulate so quickly! If you have a good filing system, it should take less than ten seconds to find any stack of ungraded student work in your filing trays. Use the ideas in Chapter 4 of The Cornerstone book (which is about Avoiding the Paper Trap), so there will be no more confusion about what’s already been entered into the computer grade book, what’s has been graded and what hasn’t, etc.
Don’t let papers go ungraded for more than a week, tops. This is easier said than done! However, more than once I have been in the middle of grading a tedious math worksheet when I realized I had already tested the kids on the material. What’s the point of grading the practice class work at that point? It was too late for me to assess whether or not the kids were getting it, and because I never provided them feedback on how they did, it’s possible that a number of them had used the assignment to practice incorrect strategies. It was a waste of time for me and them.
Finding time to grade
In the past, I’ve set aside certain times of the day to grade papers, such as during students’ Morning Work, while the kids used math centers or completed cooperative projects (and therefore were being pretty independent), or right after dismissal. Every day during the predetermined time, I tackled whatever papers the kids had created since the day before. This was a very effective way to make sure that papers never piled up, and was manageable because my students completed most of their written work in workbooks and journals which are not graded.
I know other teachers who stay after school one day per week to catch up on their grading, and that works well for them. However, when I stay late to work on tedious tasks, I find that I have less enthusiasm and energy the next day in the classroom. For my own sanity, I get my grading done during the school day.
Taking papers home to grade
Although I’ve never regularly taken papers home, I do have an organized file folder system for transporting and keeping track of papers that I prefer to grade at my house. Sometimes I’ve used three folders for each subject (class work, homework, and tests); other years I just had one folder for each subject. Additional folders can also be useful:
- Already graded—to be entered in computer:I kept my grades electronically and put papers in this folder until the grades were entered.
- Already in computer—to be filed:I would empty this folder into the basket of papers for students to take home.
- To review/redo with class:When there were a lot of errors I wanted to go over, I placed the papers in this folder.
- Incomplete:These would be stapled to weekly evaluations on Friday as weekend homework.
- Make-up work:I normally graded make-up work every two weeks and kept it in this folder until I was ready to correct them.
- No names:I filled this file if I was going to try to find the papers’ owners later or give kids a chance to claim them.
Tips for grading student writing quickly
I realize it can be difficult (and time consuming) to think of original, carefully-worded, and encouraging comments for students, so I created this 21 page PDF of Feedback Comments for Student Writing. It contains hundreds of comment suggestions you can use for written feedback. The comments can also be used to guide your conversations during writing workshop and writing conferences, and to describe student writing for portfolio assessments, progress reports, report cards, or in parent conferences.

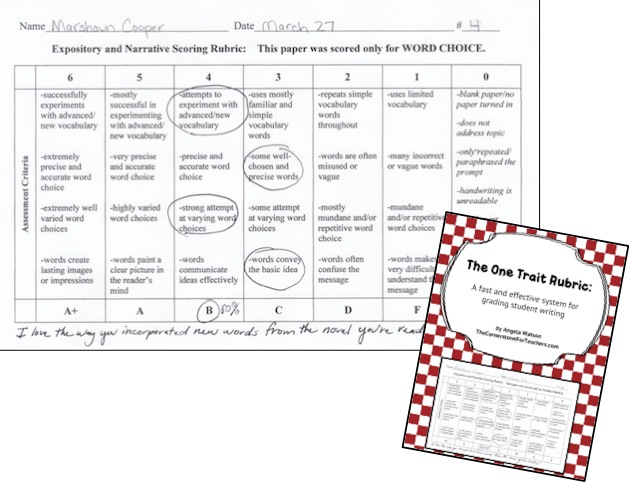
Often, you can also simplify the grading process for students’ writing. I use one trait (or single trait) rubrics to help refine my writing instruction, help students better understand characteristics of effective writing and how their work is assessed, and simplify the scoring process.
The idea is simple: since we teach traits of effective writing individually, why not assess traits individually sometimes, too? Not every piece of writing needs a full assessment, and one trait rubrics make it easy for teachers to give meaningful feedback quickly without spending hours grading essays. Additionally, assessing student writing is a subjective process that is often a mystery to students and parents: using a straightforward rubric with only 3 or 4 criteria makes it clear why an assignment earned the grade it did. It also prevents you from downgrading a paper by weighting one aspect of good writing too heavily. Concentrating on only one trait makes it easier for the teacher to fairly assess a student’s skills in a particular trait.
The system is beneficial for students, too. It can be overwhelming (especially for younger children, reluctant writers, and English language learners) to try to concentrate on all aspects of great writing at one time. Knowing that they’ll only be assessed on a single trait helps students narrows their focus and makes the task more manageable.
You can read more ideas in my blog post, 10 time-saving tips for grading student writing.
Tips for quickly assigning formal grades
Use a slide chart grading aid (easy grader).
This little device allows you to have any number of problems or questions in an assignment and calculates the grade. The easy grader prevents you from having to choose a basic number of questions for an assignment, such as 20, in order to make each question worth 5 points each. With a grading aid, having 27 or 34 questions is no problem. You can buy these for about $5 at teacher supply stores, or download a free one from my site. The quickgra.de website will calculate the same way for free online.
Grade an assignment on criteria for multiple subject areas.
If you assign a reading passage with questions about living organisms, you can take reading AND science grades from the same assignment. A population graph activity may provide you with social studies AND math grades. At the top of students’ papers, write the subject area and grade for each, e.g., ‘Rdng- B, Sci- A’.
Collect grades from several workbook pages at a time.
This is a useful strategy for grading assignments in workbooks when children aren’t supposed to rip the pages out. It works best when you need the grades for documentation purposes and don’t need them for information on student progress. Collect the workbooks and record grades all at once for several assignments by flipping to the page numbers that students completed. You can even have students fold down the page corners to help you find them more easily. This process is much more efficient than collecting workbooks or journals after every single assignment. If for some reason you must do it that way, have students stack their workbooks while they’re still open to the right page so you don’t have to flip through them.
When grading multi-page assignments, grade the first page for each student, the second page for each student, and so on, rather than grading the entire test for one student at a time.
This is an invaluable tip that I learned years back, and it has saved me countless hours. When grading one page at a time, you tend to memorize the answers, making it easier to spot errors. If there are a lot of problems on each page, write the number the student got wrong at the bottom of the page, such as –0 or –3, and then after you have graded the whole stack, go back through and count up how many each student got wrong by looking at the minus-however-many that you wrote at the bottom of the pages.
Use accurate student papers instead of making answer keys.
After the first quarter of the school year, you’ll have a pretty good idea about which students will have the right answers on their papers. If you don’t have an answer key for an assignment, check two or three of those students’ papers against each other first, and find one that is basically correct. Mark corrections for any mistakes on the paper, then use it to check all other students’ work against. This is much quicker than making an answer key, and if you photocopy the child’s paper, you can save it and use it for the key again the following year.
Make an answer key transparency.
For lengthy assignments or those you plan to use for several years, make photocopies of bubble sheets (like those used on standardized tests—check the back of your teacher’s guides) and have your students fill in the bubbles instead of writing answers on the test or blank paper. Make an answer key on a blank transparency using a permanent marker. When you are ready to grade, place the transparency over a student’s paper and count how many bubbles don’t match up between the student’s sheet and the answer transparency. I grade my students’ Scholastic Reading Inventory tests this way and can get through an entire class set (45 questions each) in less than 10 minutes.
Tips for keeping a grade book and averaging grades
Give letter grades instead of percentages.
Not every school district allows this, and not all teachers like the idea, but this will save you so much time! Essentially, instead of having to calculate the exact percentage a child earned, such as 84%, you just write “B” in your grade book. This makes it much easier to glance over your grades and see how a child is doing and also how well the class as a whole scored on a particular assignment. At the end of the marking period, average the letters out mentally, or if the grade isn’t immediately clear, assign each letter a point and average it that way (A=4, B=3, C=2, D=1). If your report cards don’t allow for plusses and minuses to be given, this makes even more sense. Grading isn’t rocket science in elementary school—don’t make your job unnecessarily difficult.
Only use weighted grades if your district mandates that you do so.
Have every assignment count equally, instead of weighting tests to be equal to 50% of students’ overall grades, homework as 25%, and so on. This will save you massive amounts of time at the end of the quarter.
Simplify the way you calculate homework grades.
At the end of the quarter, I simple go through and count up how many assignments were missing. If there were 42 homework assignments given in a marking period and a child did not turn in 3, she gets a 39/42 and the computer automatically translates that into a letter grade and percentage out of 100. If your district requires you to assess homework separately for report cards, then that’s your grade. If your district expects homework to be included in each subject area’s average, you may be able to use the same homework grade for every subject, rather than differentiate with a reading homework grade, math homework grade, etc. After all, children are either doing homework or they’re not, and that choice will usually impact their grades in all subjects equally. Also, if you rarely give social studies, science, or health homework, combining all the homework assignments ensures you will have a homework grade in every subject.
Use a digital grade book.
I was hesitant to start this method because I thought it would be a pain to have to record grades and then enter them in the computer, but if you back up your files, you don’t have to keep a paper grade book at all! A computerized grade book allows you to pull up a child’s average at any point (such as when a parent calls), and at the end of the quarter, all you have to do is print out the grades.
Angela Watson
Founder and Writer
Discussion
Leave a Reply
OR

Join our
community
of educators
If you are a teacher who is interested in contributing to the Truth for Teachers website, please click here for more information.


About bubble sheet grading, we have lengthy reading and math benchmark tests three times a year. We used a laminated bubble sheet (before we started using Scantrons) and then hole punched the correct answers. All you had to do to score the test was place your key on top of a student’s answer sheet then mark a slash in any answers that didn’t match up. It was so fast and easy!!
This is a great tip, Jill! I’ve done something similar with transparencies as the answer key (you make a transparency of the answer key and then lay the transparency over the child’s answer sheet and slash to the left of the problem where the bubbles don’t line up). I like the hole punch idea better because you can mark the correct answer for the student through the hole. Cool!
This article has been so helpful. I am a first year teacher and I have been caught in the paper trap. I refuse to have this continue to happen to me year after year. Everything you described has happened to me. I especially want to return graded papers back to my students in a timely manner. None of my colleagues had a CLEAR suggestion on how to MANAGE GRADES and NOT let the grades MANAGE ME! Thank you again , I will strive for the upcoming school year to be more efficient.
Sincerely,
Yvette
Hi, Yvette! I, too, found that teachers would tell me not to get stressed out about grading, but never clearly explained how to do that! It’s difficult to find a process that works and even more difficult to explain it. But once I figured it out, I knew I had to write it down so other teachers could benefit!
There are lots more ideas for grading in The Cornerstone book. The ‘paper trap’ chapter would probably be very helpful for you, too, because it explains step by step how to create a place for EVERY paper you come across. 🙂
I’m returning to teaching after being gone for 16 years. Your tips have helped alleviate some of my anxiety. I intend to use several tips. Thanks so much.
I appreciate your kind words. Welcome back!
Thank you very much Iam a new teacher ,your grading is very helpful . Venessa